Ink Well pad printer making package


- Details
- Category: Pad Printing Package
- Published on Sunday, 25 August 2013 20:20
- Written by shichang ding
- Hits: 6719
|
Ink Well pad printer making package: Including: 1 Manual ink Well pad printer |
|
Open inkwell printerOpen ink well systems use a trough (ink well) for the ink supply, located behind the printing plate. A flood bar pushes a pool of ink over the plate, and a doctor blade removes the ink from the plate surface, leaving ink on the etched artwork area ready for the pad to pick up. AD:blade is very cheap, waste ink, Sealed ink cup printerSealed ink cup systems employ a sealed container (ink cup), which acts as the ink supply, flood bar and doctor blade all in one. A ceramic ring with a highly polished working edge provides the seal against the printing plate. AD: ceramic ring is expensive, save ink. |
|
|
Advantages of Photopolymer Plates making:
1. Good for the environment, no need chemicals. |
Photopolymer Plates The plate material is UV photosensitive and when exposed to an ultraviolet light through a high contrast negative, the U.V. cross links the polymers and hardens the image. The unexposed portion of the negative is washed off in plain water, dried and post exposed. the plate is ready for the press in less than thirty minutes. |
1:Pad Printer (Inkwell) ONE UnitTECHNICAL PARAMETER:Max printing area 80×80mm Steel plate size 100×100mm Max workpiece length 150mm Level stroke 100mm Pad vertical distance 60mm Printing speed 400pcs/hr Out dimension 400×200×500mm Machine net weight 27kg
Free two pads
|
 |
|
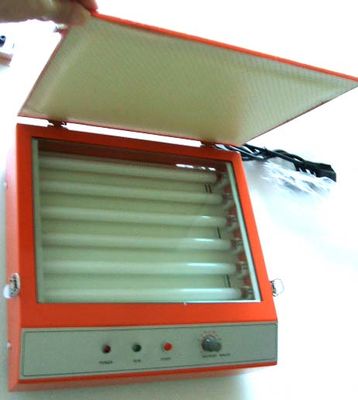
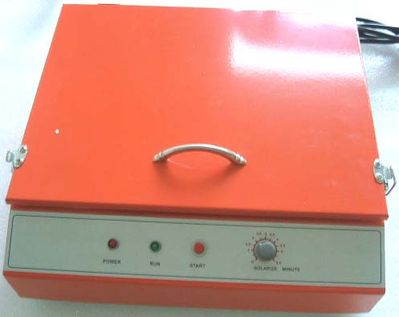
2:UV Exposure Unit : ONE Unit Main features: User-friendly desktop design with long-term life span Parameters. 6 UV fluorescent tubes Exposing area: 10.23"x8.26"(260x210mm) |
 |
 |
|
|
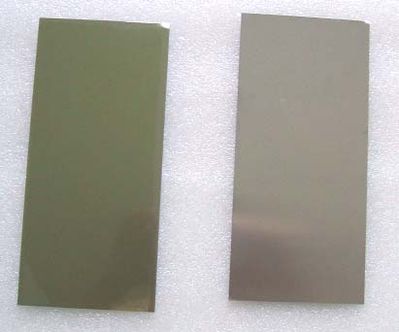
3:Polymer plates: 20 sheets Size: 75mm x 100 mm(for our ink well pad printer ) If you need more, can buy from our store:
|
 |
 |
|
|
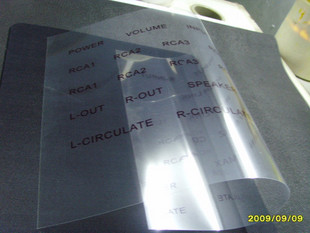
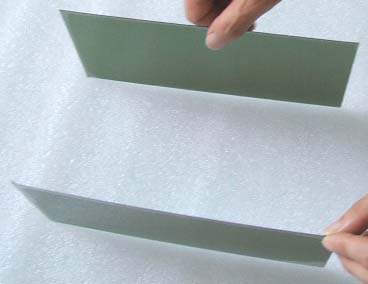
4:Transparent films: 20 SHEETS ( for ink-jet printer or laser priter uses ) If you need more, can buy from our store: Any Epson、HP、Canon ink-jets printers can use it. This Film is a specially coated,clear film that absorbs quick drying inkjet ink, and controls the shape of fine lines and half tones,can be used to make stencil in screen printng,hot stamping and pad printing.Ink-jets achieve better quality. Print on the coated (matte) side of the film! Note 1: This film also can be used in your laser printer A4 8"x12" (210x297 mm) |
 |
|
Polymer plates Pad Printing Plate Making Process
|
|
 |
1.Contact with Positive film Remove cover film slowly and place positive film onto undeveloped plate. |
 |
2.Exposure Expose plate, through positive film, to UV light having 360 nm wave lengths for 1-2 minutes. |
 |
3.Contact with screen film Remove positive film and place screen film on undeveloped plate.240 and 300 lpi screen films are available and are supplied by our distributor in your country. |
 |
4.Exposure Expose plate, through screen film, to UV light having 360 nm wave lengths, for 5-6 minutes. |
 |
5.Wash-out Remove screen film. |
 |
6.Drying Dry the plate in a hot-air dryer after removing the surface water by sponge roll or compressed air at 50-70 |
 |
7.Post exposure Expose the dried plate to UV light again for 5-10 minutes in order to get stability. |
General Hints:
|
|
|
Important notes about making printing plates: * The first exposure time on the film positive determines the overall depth of the ink well. The SHORTER the exposure time the deeper the printing plate. |
|
Shipping |
|
-When payment received, shipping will be made within 3 business days - Please note your phone number and your address on Paypal for shipping , when special status happened, shipping company will call you. - Seller is responsible for all damage on delivery. - We ship items out Monday-Friday. - Shipping is NOT available to P. O. Boxes. - Items are NOT shipped out on Saturday or Sunday. |
|
Refund policy
|
| We will accept returns on all items within 30 days of you receiving the package. Please notify me of your intention to return the package within that time so We know to look for the package and can have your refund ready to send to you when I receive the package back. Refunds will be for item cost only shipping and handling will not be refunded. Item must be in the same condition as when item was sent. Shipping and handling in any case are not refundable. |
|
Warranty policy
|
| - One year warranty from you receive the item. - Warranty covers whole machine, includes electrical, mechanical. - Any warranty shipping cost to us is responsible by buyer. - Any shipping cost to buyer is responsible by us. - Service center located in Toronto , Canada. Spare parts are available upon providing parts number and name. |
|
Policies & Terms:
|
|
* Asking Questions email: This email address is being protected from spambots. You need JavaScript enabled to view it. We make all attempts to answer emails within 24 hours. *Feedback Policy Please leave a positive feedback for us if everything is as described in our auction and policy, and we'll promptly do the same for you in return. If anything is other than as described in our auction and policy, please contact us via email right away so that we can look at the issue and arrive at an agreement before leaving poor feedback. |
|
In response to customer requests, we have developed Online Parts Order System in Toronto , an ongoing program where we will be stocking the majority of parts for our machine: We are committing to our customers that we will have "The Right Parts at The Right Price at The Right Time." These efforts will bring to our customers: |
Sealed ink cup pad printer making package
- Details
- Category: Pad Printing Package
- Published on Sunday, 25 August 2013 20:14
- Written by shichang ding
- Hits: 5499
|
Pad Printing starter Printer Kit.Our “package” is designed to get you on the road to pad printing without wasting any valuable money. Pad printing is used for printing on various substrates like Plastics, Metals, Glass and Ceramics, Paper and Cardboard, Leather.However, it is primary used in places where the printing area is small and / or the contour or surface of the object is not flat or hard to reach by other printing process.We have pad printing full package: Sealed ink cup pad printer + cliche making package, using Photopolymer plates ,which are the most popular, providing a good do-it-yourself option. These are typically used in short to medium production runs.
If you are new to pad printing or indeed wish to “get a feel” for pad printing without initially investing too much on a larger automated machines, then you will find our manual pad printer will offer you true value for money. Our manual machine is also very easy-to-use thus highly suitable for a beginner. Pheumatic pad printer machine ( New ! )
|
||
|
Sealed ink cup pad printer making package: Including: 1 Manual sealed ink cup pad printer | ||
|---|---|---|
|
Advantages of Photopolymer Plates making:
1. Good for the environment, no need chemicals. |
Photopolymer Plates The plate material is UV photosensitive and when exposed to an ultraviolet light through a high contrast negative, the U.V. cross links the polymers and hardens the image. The unexposed portion of the negative is washed off in plain water, dried and post exposed. the plate is ready for the press in less than thirty minutes. |
|
|
1:Pad printer (sealed ink cup system)
Parameters Operation Way: manual
|
  |
|
|
2:UV Exposure Unit
Main features: User-friendly desktop design with long-term life span Parameters. 6 UV fluorescent tubes Exposing area: 10.23"x8.26"(260x210mm) |
|
|
|
3:Polymer plates:
|
|
|
|
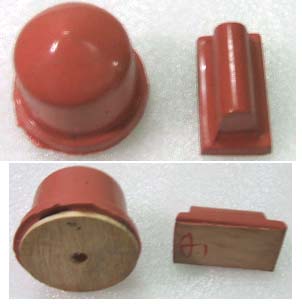
4: Pads Pads are three dimensional objects typically molded of silicone rubber. They function as a transfer vehicle, picking up ink from the printing plate, and transferring it to the part (substrate). They vary in shape and durometer depending on the application. There are three main shape groups: "round pads", long narrow pads called "bar pads", and miscellaneous shapes (square, rectangular, etc.) called "loaf pads". Within each group there are three size categories: small, medium, and large size pads. It is also possible to engineer custom-shaped pads to meet special application requirements. |
 |
|
|
5:Transparent films ( for ink-jet printer or laser priter uses ) Any Epson、HP、Canon ink-jets printers can use it. This Film is a specially coated,clear film that absorbs quick drying inkjet ink, and controls the shape of fine lines and half tones,can be used to make stencil in screen printng,hot stamping and pad printing.Ink-jets achieve better quality. Print on the coated (matte) side of the film! Note 1: This film also can be used in your laser printer A4 8"x12" (210x297 mm) |
|
|
Buy the package, please click here
About Pad printing From Wikipedia
- Details
- Category: Pad Printing Package
- Published on Sunday, 25 August 2013 20:10
- Written by shichang ding
- Hits: 5709
Pad printing cycle
- From the home position, the sealed ink cup (an inverted cup containing ink) sits over the etched artwork area of the printing plate, covering the image and filling it with ink.
- The sealed ink cup moves away from the etched artwork area, taking all excess ink and exposing the etched image, which is filled with ink. The top layer of ink becomes tacky as soon as it is exposed to the air; that is how the ink adheres to the transfer pad and later to the substrate.
- The transfer pad presses down onto the printing plate momentarily. As the pad is compressed, it pushes air outward and causes the ink to lift (transfer) from the etched artwork area onto the pad.
- As the transfer pad lifts away, the tacky ink film inside the etched artwork area is picked up on the pad. A small amount of ink remains in the printing plate.
- As the transfer pad moves forward, the ink cup also moves to cover the etched artwork area on the printing plate. The ink cup again fills the etched artwork image on the plate with ink in preparation for the next cycle.
- The transfer pad compresses down onto the substrate, transferring the ink layer picked up from the printing plate to the substrate surface. Then, it lifts off the substrate and returns to the home position, thus completing one print cycle.
Plate and ink interface technologies
Open inkwell system (older technology)
Open ink well systems use a trough (ink well) for the ink supply, located behind the printing plate. A flood bar pushes a pool of ink over the plate, and a doctor blade removes the ink from the plate surface, leaving ink on the etched artwork area ready for the pad to pick up.
Sealed ink cup system (latest technology)
Sealed ink cup systems employ a sealed container (ink cup), which acts as the ink supply, flood bar and doctor blade all in one. A ceramic ring with a highly polished working edge provides the seal against the printing plate.
Printing pad
Pads are three dimensional objects typically molded of silicone rubber. They function as a transfer vehicle, picking up ink from the printing plate, and transferring it to the part (substrate). They vary in shape and durometer depending on the application.
There are three main shape groups: "round pads", long narrow pads called "bar pads", and miscellaneous shapes (square, rectangular, etc.) called "loaf pads". Within each group there are three size categories: small, medium, and large size pads. It is also possible to engineer custom-shaped pads to meet special application requirements.
Image plate
Image plates are used to contain the desired artwork "image" etched in its surface. Their function is to hold ink in this etched cavity, allowing the pad to pick up this ink as a film in the shape of the artwork, which is then transferred to the substrate.
There are two main types of printing plate materials: photopolymer and steel. Photopolymer plates are the most popular, providing a good do-it-yourself option. These are typically used in short to medium production runs. Steel plates come in two choices: thin steel for medium to long runs, and thick steel for very long runs. Both steel plate types are generally processed by the plate supplier as it involves the use of specialized equipment.
Printing ink
Ink is used to mark or decorate parts. It comes in different chemical families to match the type of material to be printed (please consult the substrate compatibility chart for selection).
Pad printing inks are "solvent-based" and require mixing with additives at the time of use. They typically dry to the touch in seconds although complete drying (cure) might take a substantially longer period of time. Inks of today(2010) have come a long way. There are many more options. Inks that cure via the use of Ultra Violet light are convenient for certain applications. UV inks will not fully cure until UV light hits the ink. UV curable ink can be wiped off many substrates when mistakes are made. They can be cured with UV light in as fast as 1 second of light exposure. This depends on the ink, substrate and the light power and spectrum. UV inks can be reused as the pot life can be high as long as the ink stays clean, blocked from UV light and hasn't broken down from sitting. This same feature makes it easier to clean than some solvent and epoxy like two part component inks. Also there are heat curable inks too, which work in much the same way as UV in the sense that there is a "trigger" for curing at your convenience. Two part inks usually have a pot life of only a few hours or so. They must be disposed of when they cannot be revived(by means of retarders etc..) Ink choices are available in many convenient and time savings forms, but for some substrates you will have to use the type of ink that best adheres to the surface.
Climatic conditions will significantly affect the performance of any pad printing ink, especially the open ink well style printers. Too dry conditions can lead to faster evaporation of solvents causing the ink to thicken prematurely and too much moisture can lead to ink issues of "clumping" or something alike. Also the climate can affect other aspects of the printing process such as ink pick up and release from the plate to the pad to the substrate, as well as polymer plate to blade chattering or binding due to humidity. Keep this in mind when planning the location of your pad printer. Use any necessary heater, air conditioner, humidifier or dehumidifier as needed. Always consult Federal, State and local regulations regarding proper handling, storage and disposal of inks.
Substrate
Substrate is the technical name used to address any parts or materials to be printed, and it is critical to match substrates and ink series as to their chemical compatibility. Please consult the substrate compatibility chart for proper ink selection. Typically you will need a "fixture" to hold and support your substrate in order to ensure good quality printing. Fixtures vary in materials and complexity depending on the application. One of the most interesting examples of fixture making creativity is the use of Lego for short run printing. This began in a eureka moment of inspiration when Cliff Rowell, a small print shop owner and grandfather in Calgary, Canada, was playing with his grandson. This innovation has begun making its way through the industry in recent years and saves the time and expense of building job specific custom fixtures. Note that substrates need to be clean and free from surface contamination to allow proper ink adhesion.
Printing plate making
There are two main techniques used to create a printing plate. The traditional technique requires a UV exposure unit and involves photo exposure with film positives and chemical etching of a photopolymer plate. A second technique known as "computer to plate" requires a laser engraver and involves laser etching of a specialized polymer plate. Although the latter technique is convenient for short run printing it does have several disadvantages over the former.
Laser plate making is a process that requires the use of a very soft, low quality polymer coated plate. Thus, the standard cycle life that can be expected out of a laser etched plate is quite low (10,000 impressions on the high end). By comparison, a hardened steel plate can easily last for over 1 million impressions.