|
Model |
CT-65 |
|
Stamping max area(Bronzing area) |
180 x 280 (mm) / 7x11''
|
|
Stamping Speed |
1000m/min |
|
Power |
1000W, 220V / 110V optional |
|
Temperature |
1-300 degree |
|
Max pressure |
2.5 tons |
|
Weight |
90kg |
Hot Stamping Temperature setting:
Paper: 85-120C
Soft plastic: 75-85C
Hard plastic: 35-100C
Soft PVC: 65-80C
Leather: 75-85C
Design - Plate making - Hot stamping - Product Only 30 minutes
Hot stamping and plate making integrated. The machine itself has the function of plate making. If used properly, you can get a very perfect bronzing effect.
Semi-automatic. It can automatically thermostat, set itinerary, automatically jump. This machine can finish hot stamping, embossing stamping, relief, creasing, die cutting. It can also hot stamping the general fragmented shape stamping, printing plate.
This machine is widely used in calendars, certificates, packaging, business cards, stickers, and trademarks stamping. Excellent artwork effect. It can hot stamp paper, leather, plastic, hard plastic, Soft PVC, wood, bamboo, photographs, fabric to print patterns, text and combination mark.

Structure Anlysis
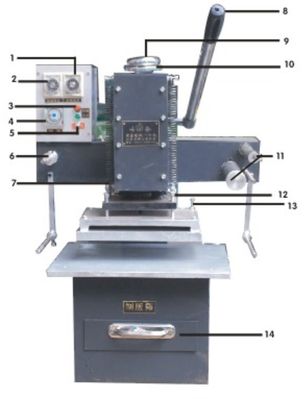
1. Adjusting knob for hot foil paper moving distance
2. Adjusting knob for setting UV exposing time. Plate making period: 10-15 Mins.
3. Open/Close switch for plate making. After setting the UV exposing time, open the plate making knob. After exposing, you must close the knob.
4. Hot stamping temperature setting knob. Hot stamping temperature: 80-150℃
5. Power switch.
6. Hot foil paper sending cramp
7. Hot foil paper moving distance adjusting knob. If the foil does not move, adjusting the knob.
8. Bronzing manual press bar
9. Pressure adjusting hand wheel. 2cm adjustable up and down
10. Locking wheel after pressure adjustment
11. Foil paper collector
12. Stamping level adjustment bolt
13. Small stamping item balancing bolt
14. UV exposing cramp for plate making
Hot stamping polymer plate making process
To make the hot stamping polymer plate, you do not need to use any printer. You need to use the UV Exposing box at the bottom of the machine.
First, print the texts you designed in computer on the inkjet film with inkjet printer.
Note:
1. This inkjet film is only coated on one side. Print texts on the coated (matte) side of the film!
2. Mirror print the texts or the images.
3. The texts should be white color(transparent), all the other area should be in black color. .
4. The image is well-resisting and you can use it next time.
Second: Cover the well printed film on the hot stamping plate. To make sure they contact tightly and no bubbles in between. Put the plate into UV exposing box, the black area will be cliched by the UV light during the exposing. Exposing period: 10-15 mins. When the exposing is over. You take out the plate. Then you can brush out the cliche. You will find the texts you want is embossing out. Then you can do the stamping work.
|

